If you’re trying to keep cool this summer, having ice lollies in your freezer is a must! They’re a popular summer treat, and for a good reason. They’re fruity, refreshing, and offer a little bit of a sweet treat to enjoy on a hot day. The only issue is that they are usually made by someone else, like a store. However, they are easy to make at home too, and you won’t even need an ice cream maker; all you need are the moulds and fruit juice or puree. If you would like to try making ice lollies at home for the first time, keep the following tips in mind to ensure you create the perfect lollies.

The Basics For Homemade Ice Lollies
Before you start anything, you first have to choose what kind of ice lollies you would like to make – creamy or fruity? Once you have made your decision, there are only a few basic steps and considerations that go into making ice lollies.
- Flavour
Ripe and even slightly overripe fruit will make the best flavour for ice lollies, as they are naturally sweeter. But, you can always add a little bit more sweetness to the mix with honey or maple syrup. It’s good to remember that when frozen, the taste won’t remain as sweet, so you’ll want to make your ice lolly mixture a bit sweeter than you generally would a smoothie.
- Moulds
Once you’ve got your mixture ready, you can go on adding it into the moulds. You can buy ice lolly moulds from most homeware stores for an affordable price. Silicone moulds are the best when removing the ice lollies, and are easy to clean afterwards. If you don’t have moulds, you can always use shot glasses, yoghurt containers, muffin tins, or ice cube trays. The mixture will naturally expand as it freezes, so you’ll want to leave a small bit of space at the top of the moulds when pouring in your mixture.
- Stick
You must add sticks to the mixture before freezing the moulds. If your moulds have a lid, that should help them to stay upright. If you struggle to keep them standing up straight, wrap the top of the mould with foil, but try to keep the foil from touching the mixture. Then simply poke your sticks through the foil, and that should keep them standing up straight.
- Freeze
The most important part of making these frozen treats is of course the freezing. Depending on how much mixture the moulds hold, it will take between 4 and 8 hours for the mixture to freese. To make your pops even better, turn your freezer to its highest setting. The faster your ice lollies freeze, the softer they will turn out.
- Time To Unmold
You may find that running the mould under warm running water while moving it around evenly, warms each of the moulds. Your ice lollies should then take only a few seconds to come out easily.
Fruit Ice Lollies
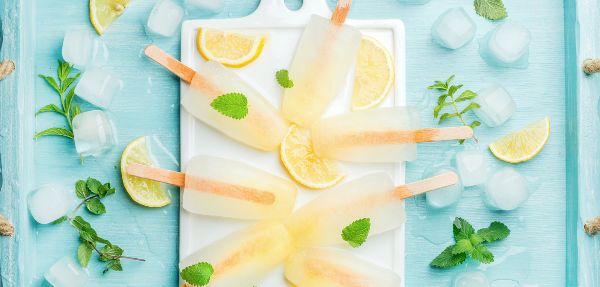
To make these types of ice lollies, you’ll need to choose a fruit. Most berries work well, you can also use mango, pineapple, kiwi, peach, or watermelon. Next, you’ll need to add a liquid and sweetener. Fruit juice is a great way to add more flavour to your mixture, and a bit of freshly squeezed lemon juice can help enhance the taste too. But simple water is also good enough to add to your mixture.
Method:
- Blend your berries or fruit with fruit juice and sweetener in a food processor or blender.
- Give it a taste, then add more sweetener if you feel it needs more.
- Divide the mixture into the ice lolly moulds, and add a stick into each one.
- Put the ice lollies in the freezer. After 4 hours you can check if they are set and ready. If not, leave them in the freezer for another 4 hours or until solid.
Creamy Ice Lollies
Plain Greek yoghurt is perfect for making creamy homemade lollies. It has less water content than normal yoghurt, which means fewer water crystals to make the lollies icy.
Full-fat coconut milk from a can is another base that can be used for making healthy, creamy ice lollies. These usually come out in a soft, melt-in-your-mouth texture, due to their higher fat content.
You can choose either. Once you have decided which option you’re going to start with, you will want to sweeten it with some honey, maple syrup, or any other sweetener you may have, before mixing it with your favourite flavouring.
How To Make Fruit-Flavoured Ice Lollies
Here is the basic method for making fruit salad ice lollies. This method should be the one to follow for most kinds of lollies; simply switch out the liquids. For example, for creamy ice lollies, you’ll add coconut milk or yoghurt as a base instead of water or fruit juice.
You will need:
- 250g of ripe berries, or any fruit of your choice.
- 100ml of fruit juice or natural yoghurt.
- 1 teaspoon of sweetener like honey or syrup.
- Ice lolly moulds, or empty yoghurt pots.
- Blitz your fruits and juice with the sweetener of your choice in a blender or food processor.
- Taste your mixture, and add more sweetener if necessary.
- Next, you can pour the mixture out into the moulds. This amount should be able to fill 4 moulds. Add a stick to each one.
- Place the moulds into the freezer for 4 hours or until frozen.
When removing the ice lollies from the moulds, you may need to run them under some warm water to make them slide out easily out for serving.
Conclusion
Enjoy your ice lollies once completely frozen to get the best flavour. Ice lollies are best eaten up within a week. If you’re saving them for another day, it’s best to wrap them up in glad wrap or place them into separate airtight containers to avoid freezer burn. Making ice lollies is simple and can be a fun thing to do for the kids to take part in, especially during the summer holidays. Homemade ice lollies are a healthy, delicious treat that will be enjoyed by everyone on a hot summer’s day.
While you cool down with an ice lolly by the pool, let one of our SweepStars come and clean your home, leaving it in a pristine condition, so you can spend more time doing the things you love.